Thursday, August 25, 2005

Threding Pattern Template

Below is the code listing I use as a template when I want to handle basic multi-threading.
The Template uses the following Pattern:
  • BeginProcess
  • Process
  • EndProcess
using System.ComponentModel;
using System.Windows.Forms;
using System.Threading;

/// <summary>
/// Represents a threading template class.
/// </summary>
public class ThreadProcessor : System.Windows.Forms.Form
{
    private System.Threading.Thread processingThread;
    
    // 
    // Note: Windows Form Designer generated code has been removed 
    // to simplify this example.
    // 
    
    /// <summary>
    /// Begins the Thread process.
    /// </summary>
    private void BeginProcess()
    {
        // Check if the thread is currently processiing.
        if (this.IsBusy)
        {
            // You could display a message here.
            this.CancelProcessing();
        }
        
        // Execute CopyColumns().
        this.processingThread = new Thread(new ThreadStart(this.Process));
        this.processingThread.IsBackground = true;
        this.processingThread.Start();
        
    }
    
    /// <summary>
    /// The method that does the work.
    /// </summary>
    private void Process()
    {
        try
        {
            // TODO: Add processing logic here.
        }
        catch (ThreadAbortException)
        {
            // This catch allows EndProcess() to be 
            // called even if the thread is aborted.
            // TODO: Optionally add cancel logic here.
        }
        finally
        {
            // TODO: Optionally add cleanup logic here.
            
            // Invoke EndProcess() on the Form's thread.
            Delegate endDelegate = new EndProcessDelegate(this.EndProcess);
            this.BeginInvoke(endDelegate);
        }
    }
    
    /// <summary>
    /// Aborts the processing thread.
    /// </summary>
    private void CancelProcess()
    {
        if (this.IsBusy)
        {
            this.processingThread.Abort();
        }
    }
    
    /// <summary>
    /// Completes the Thread process.
    /// </summary>
    private void EndProcess()
    {
        // TODO: Add end process logic here.
    }
        
    /// <summary>
    /// Returns true if the processingThread is active.
    /// </summary>
    public bool IsBusy
    {
        get {return (this.processingThread != null && this.processingThread.IsAlive);}
    }
}

/// <summary>
/// Represents the EndProcess method.
/// </summary>
public delegate void EndProcessDelegate();


c# code format

c# code format

Wednesday, August 24, 2005

The docking Panel is my friend

For formatting in .Net Windows Forms I have found the System.Windows.Forms.Panel to be especially helpful. Users expect to be able to resize their forms however they want. Panels and the docking of Controls in Windows.Forms make this task simple.

Usually my first step when creating a new Form is to add docked Panels to frame the separate areas of the form. Then I dock each Control within each Panel and Windows.Forms handles all the resizing for me.

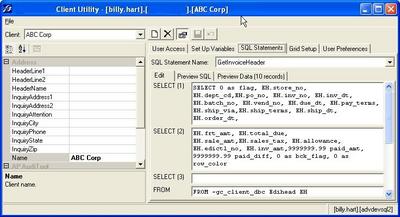
In the example below I use a Panel docked at the top of the form to make it seem like the Client ComboBox is part of the ToolBar. In fact the Client Label and ComboBox are docked to the left in the top Panel and then the ToolBar is docked to the left of the ComboBox (because there is not a ComboBox ToolBar control yet).


Also in the Edit TabPage I use Panels to frame the expanding TextBox Controls and their Labels. Each Label is docked to the left of the panel and each TextBox is docked to Fill the remaining space. As the Form sizes or the text in the TextBox changes I resize the Panel and the TextBox automatically expands to Fill the space.

Thursday, August 18, 2005

Opening

This is my first blog. I have wanted to share my thoughts on coding and hey! Google is going to make it easy for me. I plan for this blog to be where I share what I learn as I live the life of a full time programmer working with mainly with .Net, C# and SQL Server.